Welcome to FUSE! 👋
FUSE is an e-learning course that has been created for interface designers and web developers to gain (or reinforce) knowledge of CSS fundamentals.
To get the most value out of this course, you should have a conceptual understanding of the technology and structure of HTML. (HTML refresher course)
By having a working knowledge of CSS, designers and developers can make better informed decisions when creating user interfaces. Job candidates with a foundational knowledge of CSS also have access to a wider range of employment opportunities.
At the end of the course, you’ll be able to:
- Represent HTML structure using CSS properties.
- Summarize general CSS principles.
- Recall, explain, and implement CSS properties in the correct syntax.
- Structure applicable CSS properties together appropriately.
- Plan and construct common website elements using CSS.
This course was created in part with inspiration from W3Schools's CSS Tutorial.
Let's get started! 🙌
Let's see what you already know... 🤔
If you don't see the quiz below, click this button to open in a new tab.
Open QuizIntroduction 🐣
CSS is an acronym which stands for Cascading Style Sheets. When creating web pages, HTML (Hyper Text Markup Language) is the code which defines the structure of the page content, and CSS is what defines the style of the page content.
A word on Cascading ⬇️
Now, you may be wondering: "What the heck does cascading mean?" Well, think of it like a waterfall "cascading" down. When CSS is interpreted by the browser, it starts from the top of the style sheet (or style sheets – we'll get to that in a minute) and reads all the way to the bottom. For example, if the following styles are defined, the browser will render all <h1> headings with a red color since it is defined later in the style sheet.
h1 {
  color: gray;
}
h1 {
  color: red;
}
This concept of cascading and overwriting is important to remember as style sheets become more complex.
Practice
Adding CSS to HTML 💧
Let's say that you are beginning to create the following HTML page:
<DOCTYPE! html>
<html>
  <head>
  </head>
  <body>
    <h1>Hello world!</h1>
  </body>
</html>
There are three ways that you can add CSS:
1. Inline
The first method to quickly add styling to an HTML element is adding it as an inline attribute to the element.
<h1 style="color:red;">Hello world!</h1>2. Internal style sheet
The next method is to directly write styles within the <head> of the HTML document inside of a <style> element, which would look like this:
<head>
  <style>
    h1 {
      color: red;
    }
  </style>
</head>
3. External style sheet
The best – and standard – method of using CSS is to keep it in a separate document (with a .css file extension), then linking to it on the HTML page.
index.html
<head>
  <link rel="stylesheet" type="text/css" href="mystylesheet.css">
</head>
mystylesheet.css
h1 {
  color: red;
}
Now that you know how to use CSS on your HTML page, let's learn how to write CSS. ✏️
Practice
Syntax ✏️
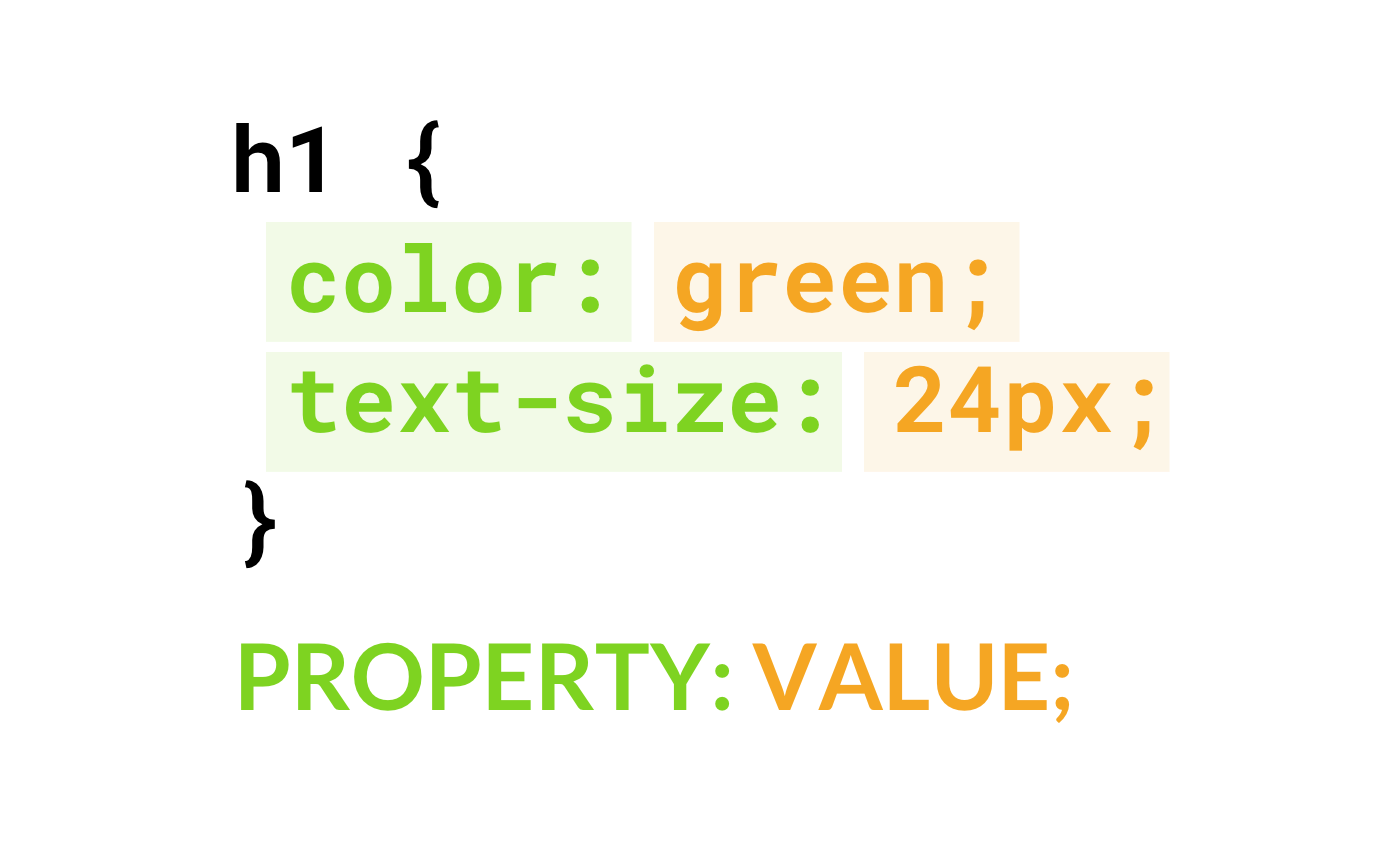
A CSS rule consists of two parts: a selector and a declaration.
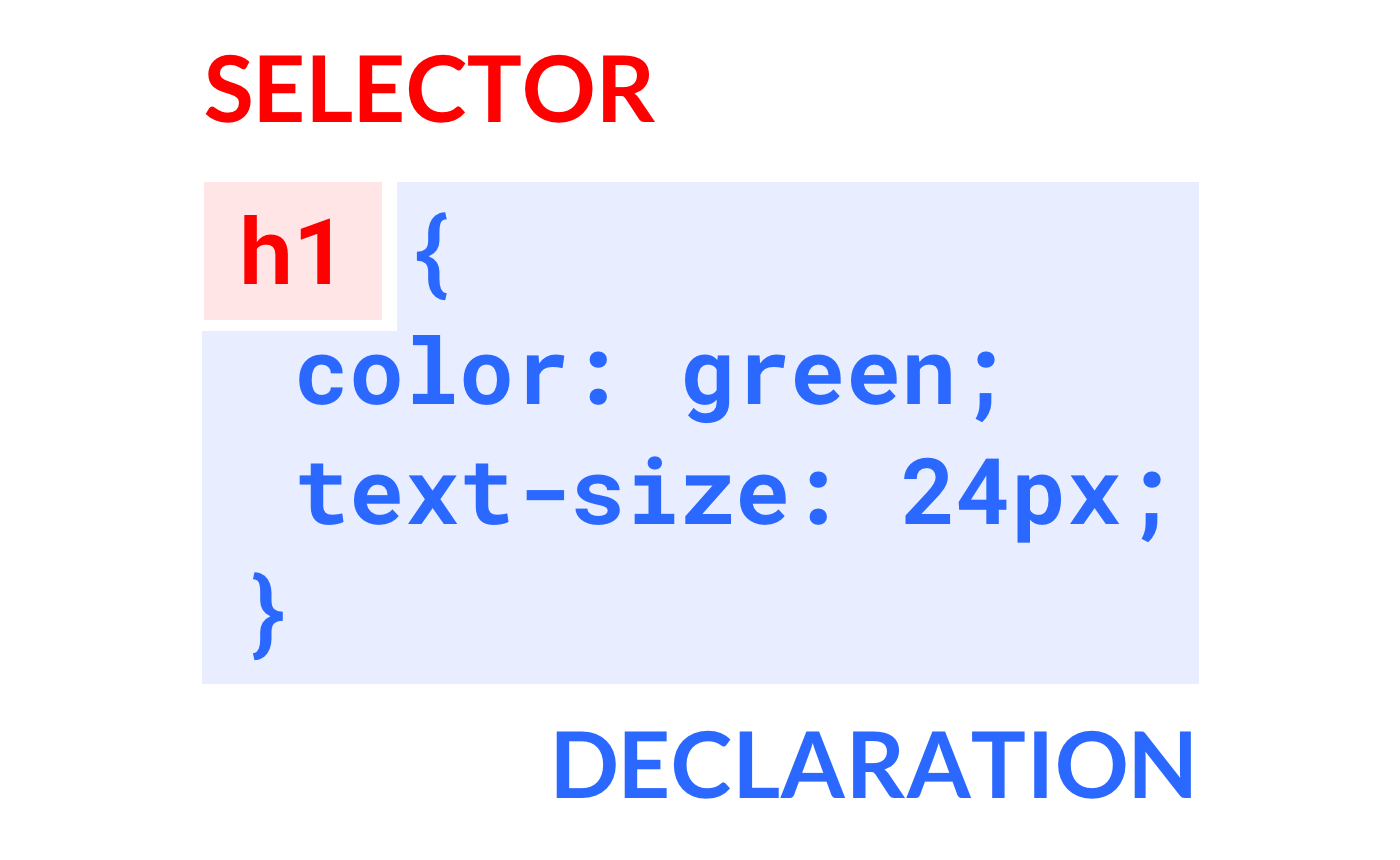
The selector is used to choose what elements you want to style. A declaration defines the properties and their value. Complex web applications can reach thousands of CSS rules.
A comment on comments 🤔
Since browsers ignore comments and do not interpret them, comments within CSS are a great way to leave notes for yourself, or others, for future reference. They can also be used to "comment out" properties that you don't want to delete entirely, or perhaps you are just experimenting. Either way, here's how you format a comment in CSS. (Notice the opening /* and closing */ – anything inside will be commented out.)
h1 {
  color: red;
  /* text-align: center; */
  font-size: 24px;
}
Practice
Selectors 👈
There are three types of selectors you can use to choose which HTML elements are selected: element selector, ID selector, and class selector.
1. Element selector
Use the element selector to select all applicable HTML elements. For example, using a <p> selector will choose all paragraph elements.
p {
  color: gray;
  font-size: 16px;
}
2. ID selector
Use an ID selector (#) to select a single element with the defined ID. Remember, there can only be one instance of an ID on a single HTML page.
<h1 id="title">Welcome!</h1>

---

#title {
  font-size: 36px;
}
3. Class selector
Class selectors (.) are the most common way to select elements using the same class. All elements with the specific class will be styled with the rule.
<div class="myButton">Save changes</div>

---

.myButton {
  background-color: green;
}
Practice
Commonly Used Properties
In the next sections, you'll learn about CSS properties. Although there are more than 250 different properties, we'll go over some of the most commonly used ones.
All properties have an inherent default. For example, text color is always defaulted by the browser to black without explicitly defining it. Keep this in mind when adding additional properties – be careful not to add unnecessary properties or values that are already inherited.
Text Properties 🔤
Here are the most common properties to style text.
Color
To change the color of the text use the color property. (If you'd like learn more about available color values, learn more here)
h1 {
  color: blue;
}
...will result in this:
Hello world! I'm feeling blue today.
Font
In order for fonts to render on the user's computer or device, they must have the same font installed. The font-family property allows you to define multiple fallback fonts in case the device does not have certain fonts. If the first font is not available, the browser will attempt the second font – and so on. The last font listed should always be a generic type (serif, sans-serif, or monospace).
p {
  font-family: Futura, Roboto, Helvetica, Arial, sans-serif;
}
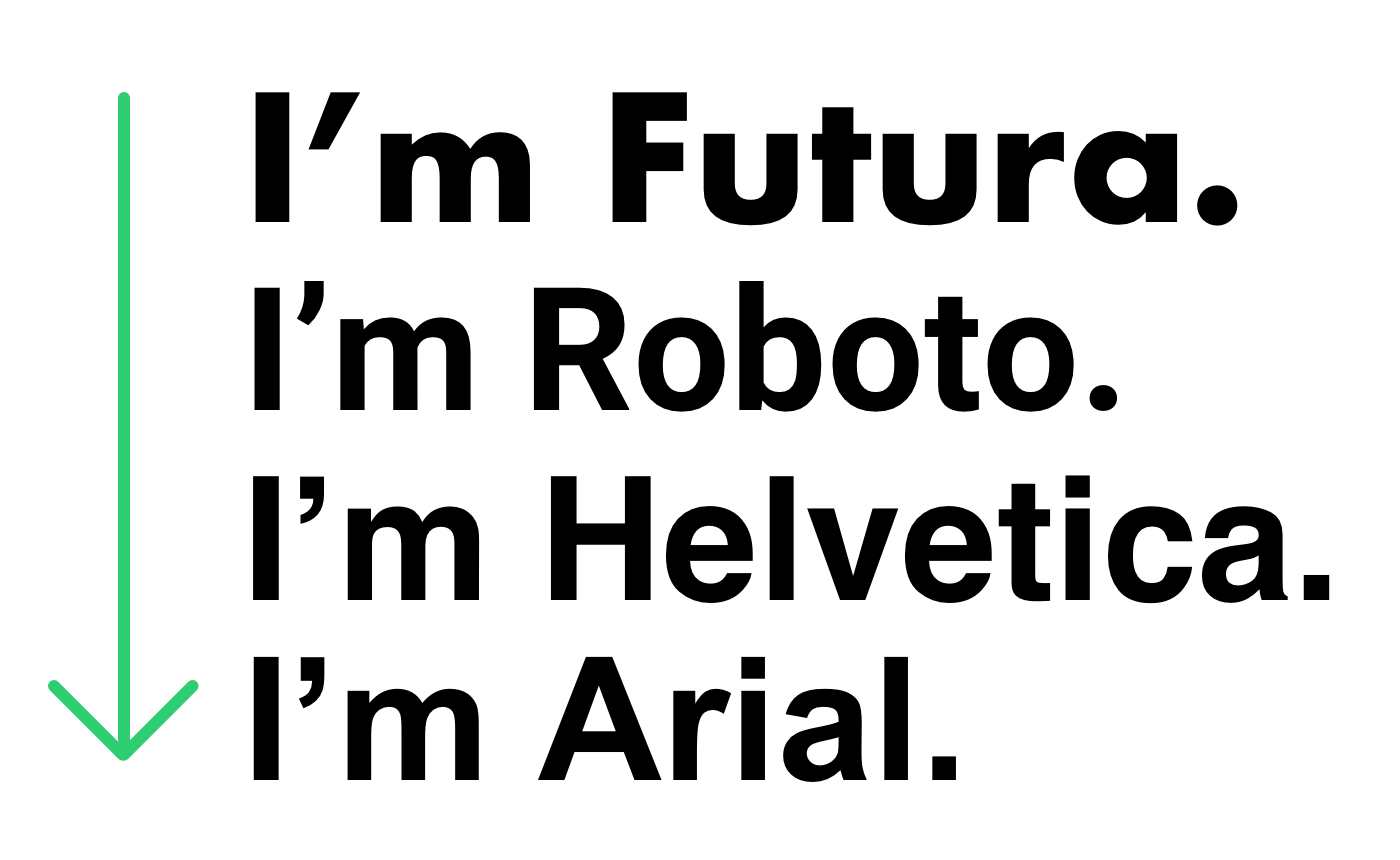
Tip: You can also attach a custom font directly to the page using the @font-face method.
Font Size
To change the text size, use the font-size property.
h1 {
  font-size: 60px;
}
...will result in this:
Howdy!
Alignment
There are some cases where you'll want to align the text of certain elements differently. For example, to center a heading, you can use text-align: center.
h1 {
  text-align: center;
}

p {
  text-align: left; /* DEFAULT VALUE */
}
Practice
Background Properties 🌠
By default, all HTML elements include an inherent transparent background color. You can modify this by using a color or image.
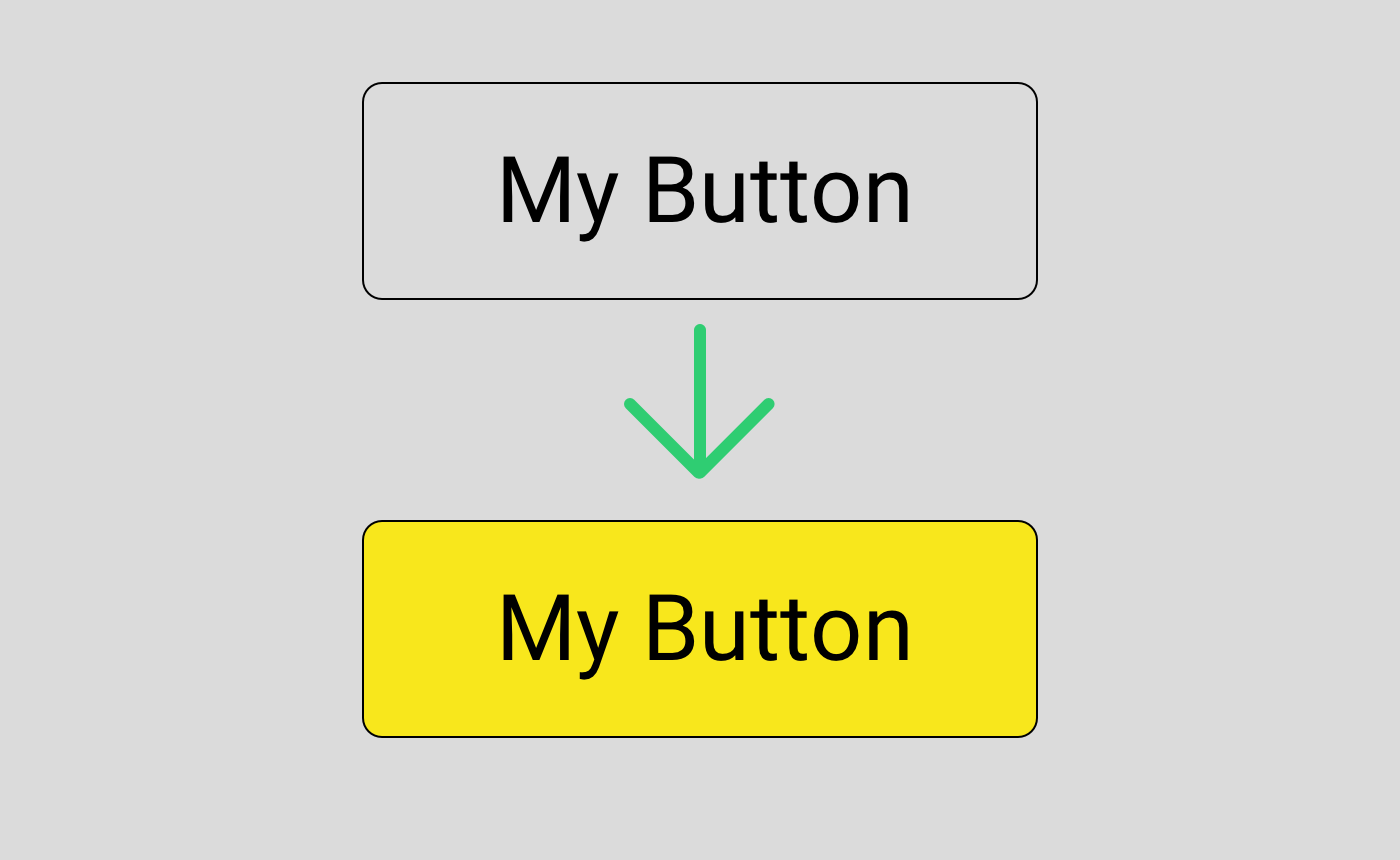
Background Color
Using background-color will replace the background of the element with a solid color of your choice.
.myButton {
  background-color: yellow;
}
... will result in this:
Background Image
If a solid color doesn't suffice, you can set the background of the element to display an image using the background-image property.
.myWelcomeContainer {
  background-image: url("USA-at-night.jpg");
}
...will result in this:

Practice
Border Properties 🔲
To style an element with a border, use the border property. This property is actually pretty flexible, because individual values can defined independently of each other with the "shorthand" format. For example, these two rules provide the same result:
.myBox {
  border: 2px solid red; /* Shorthand format */
}

.myBox {
  border-width: 2px;
  border-style: solid;
  border-color: red;
}
...will result in this:
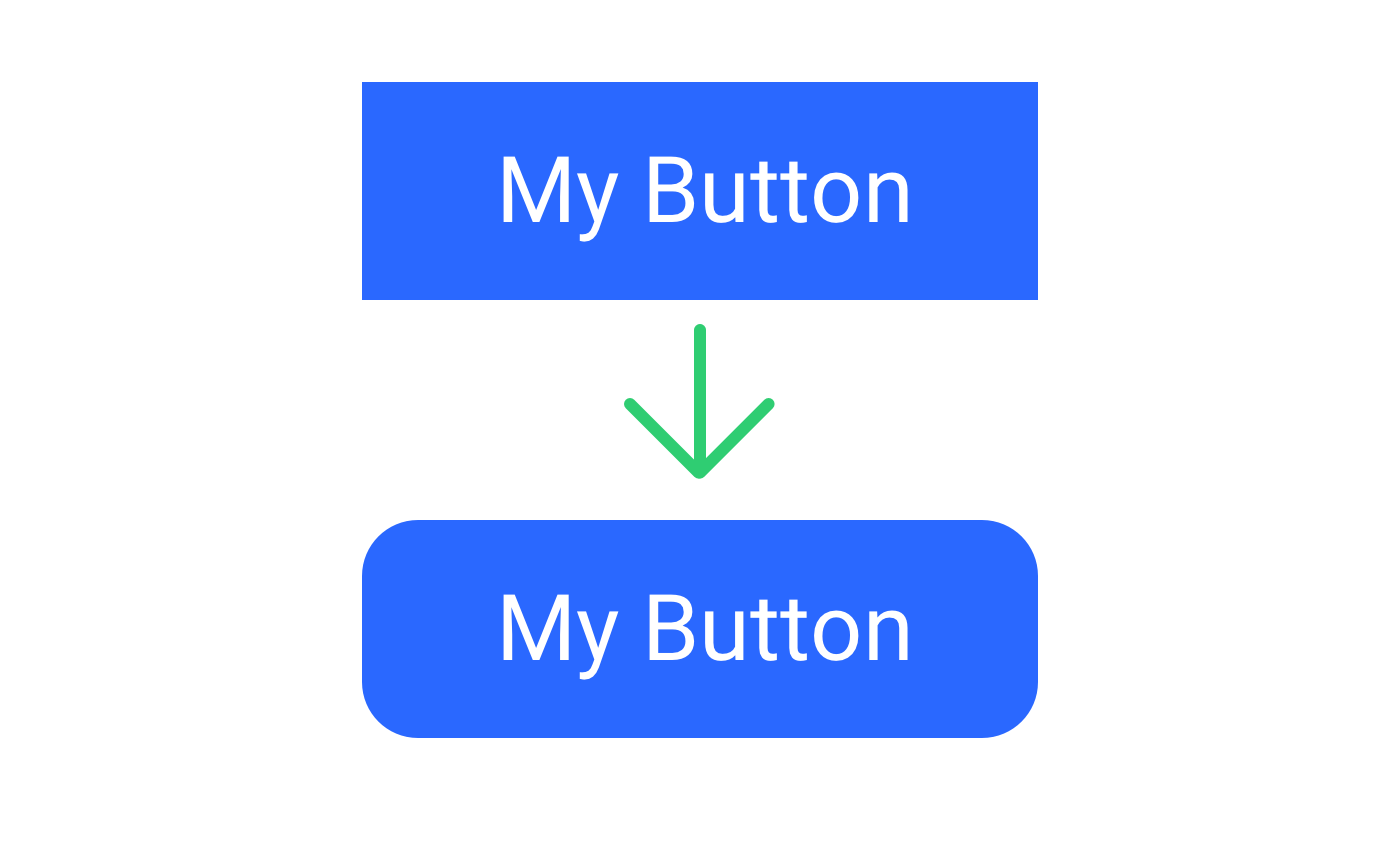
Border Radius (a.k.a. rounded corners)
An extremely popular (and useful) property is the border-radius property, which gives the element "rounded corners."
.myButton {
  border-radius: 10px;
}
...will result in this:
Practice
Other Properties 💁
Here are some other popular CSS properties that you'll find useful in practical purposes.
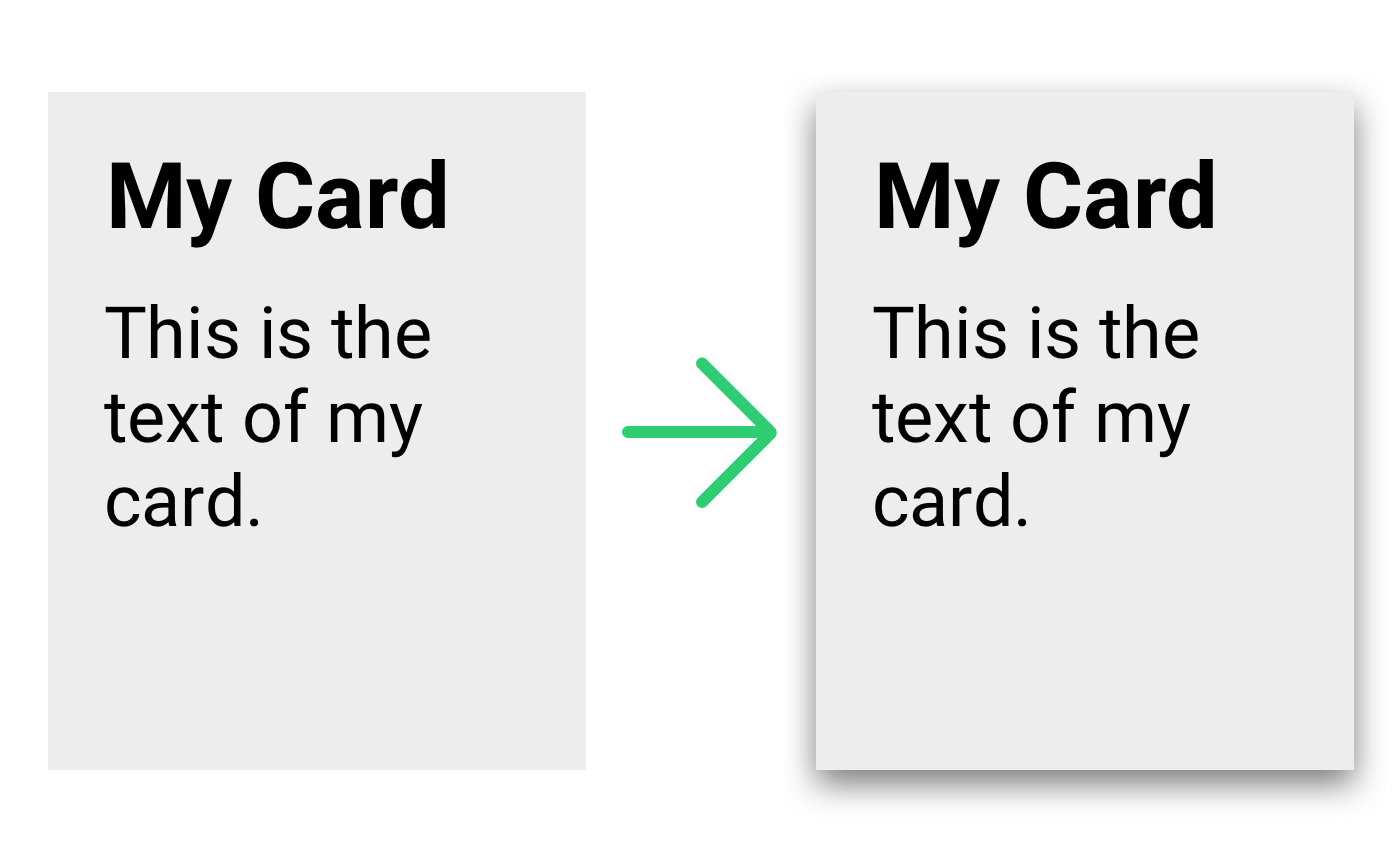
Box Shadow
The box-shadow property is a fairly new addition to CSS. It allows a "drop shadow" to be placed around/behind the element. Use shadows to add depth and purpose to your website elements. box-shadow also allows for shorthand, defined as box-shadow: [x-offset], [y-offset], [blur], [color];
.myCard {
  box-shadow: 0 7px 20px rbg(0,0,0,.50); /* black 50% opacity */
}
...will result in this:
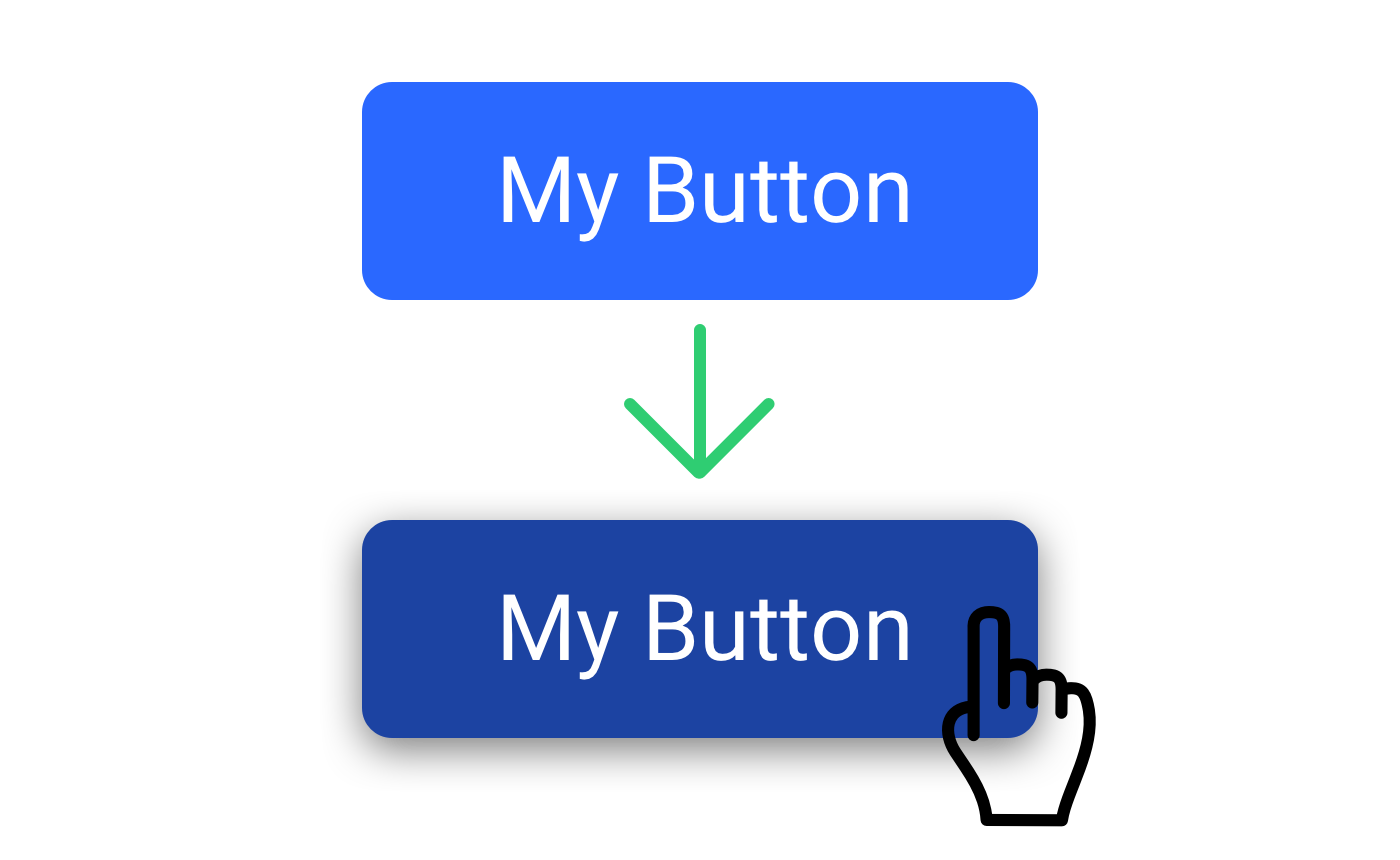
Hover
Although not a property, the :hover pseudo class defines what the element looks like when hovered over.
.myButton {
  background-color: blue;
}
.myButton:hover {
  background-color: darkblue;
  box-shadow: 0 5px 20px rbg(0,0,0,.50);
}
...will result in this:
Practice
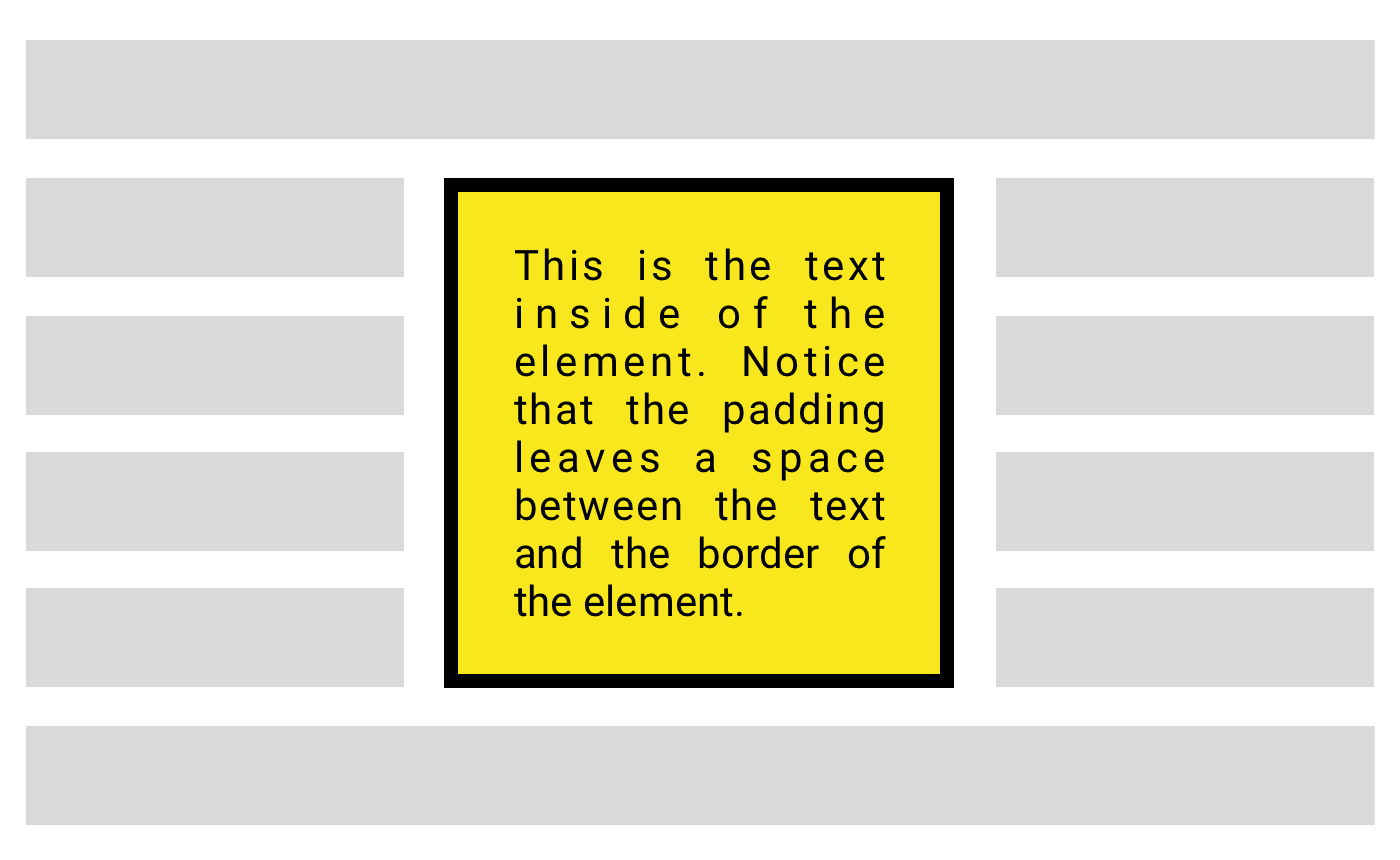
The Box Model 📦
In HTML, think about elements as if they were boxes. All element are "wrapped" in a box, which consists of the content, padding, a border, and margin.
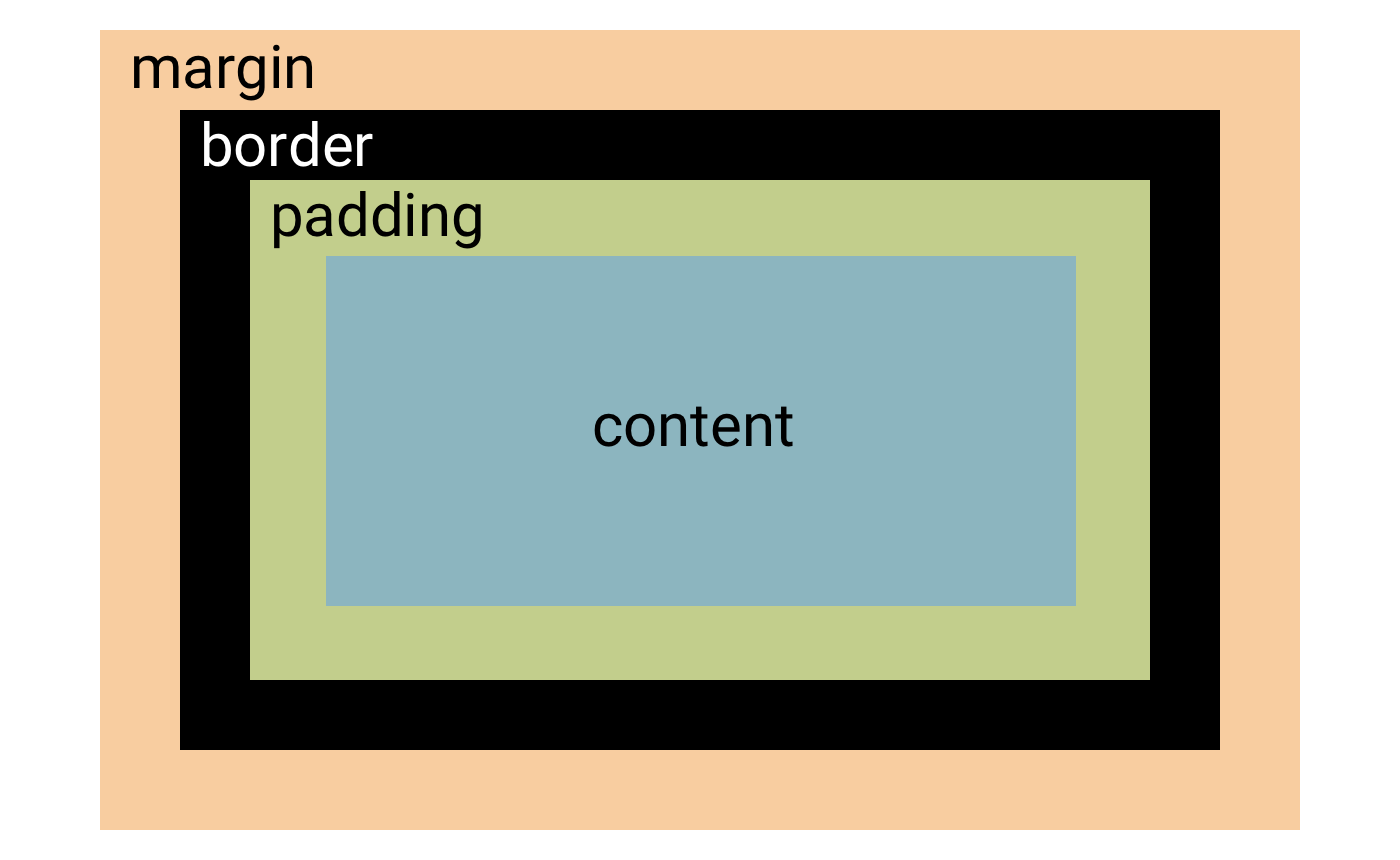
- Content - This is the contents of the box (element)
- Padding - The space around the content between the border
- Border - This is the border around the content and padding
- Margin - The space around the border that separates the element from other elements
.myBox {
  background: yellow;
  width: 100px;
  height: 100px;
  padding: 20px;
  border: 4px solid black;
  margin: 20px;
}
...will result in this:
Practice
Layout 📐
Use the following properties to layout HTML elements.
Display
By default, most HTML elements are considered block elements. This means that the element starts on a new line and takes 100% of the width of the container it is in.
.myBlockElement {
  display: block; /* default value, no need to define here */
}
.myInlineElement {
  display: inline;
}
... will result in this:
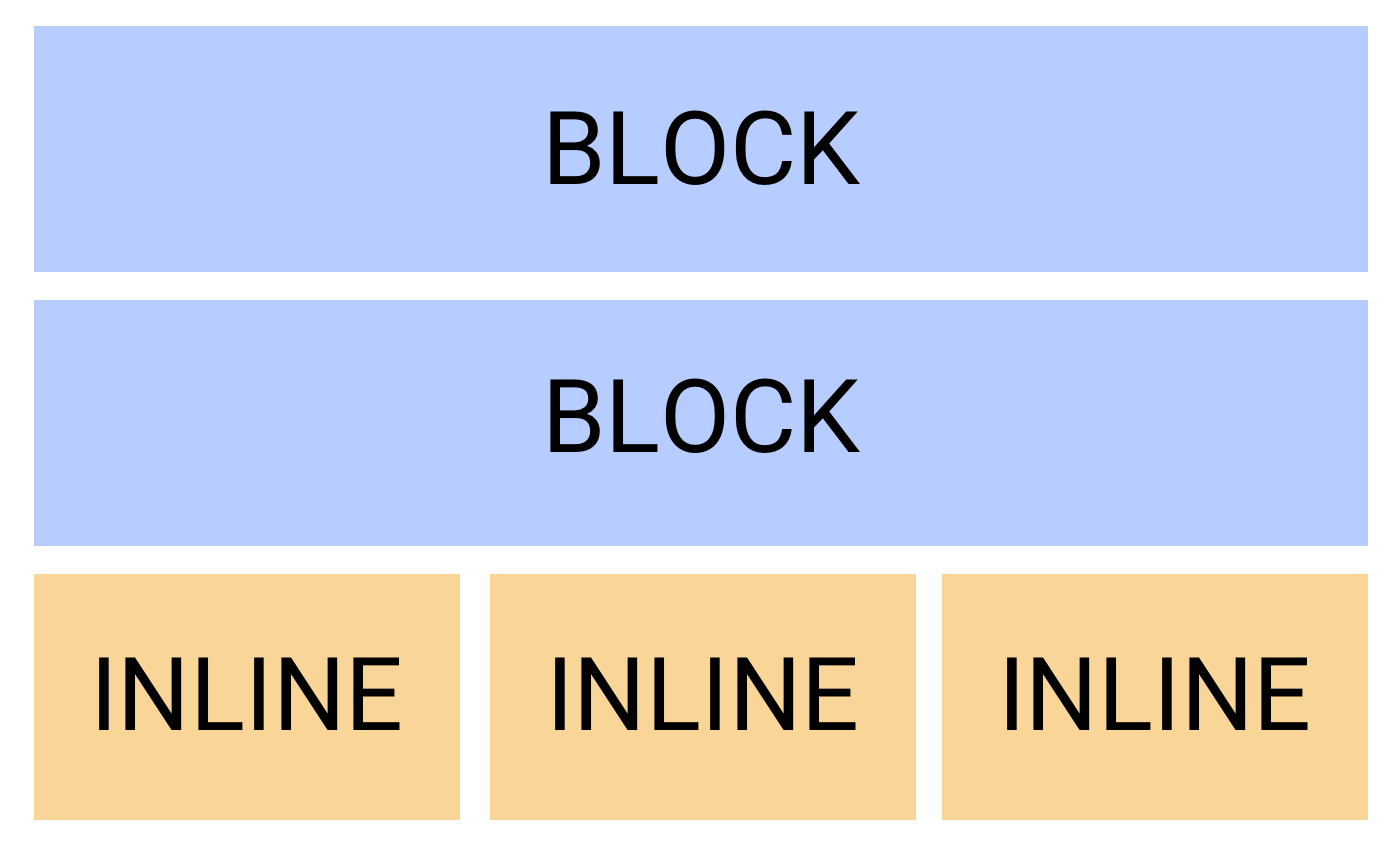
Tip: You can also use display: none to hide the element.
Position
The position property can be used to specify the position of an element. The default for all elements is position: static, which is interpreted as a normal flow for the page.
The most common use for changing the position of an element is to "fix" it to the browser window. fixed element remain in the same spot on the screen as the user scrolls. In order to use position: fixed, you also need to define where it attaches to (top/bottom/left/right).
.myNavigation {
  width: 250px;
  position: fixed;
  left: 0; /* start 0px from the left */
  top: 0; /* start 0px from the top */
  bottom: 0; /* start 0px from the bottom */
}
The above code will result in a fixed-position sidebar navigation, similar to the on seen to the left in this course (not seen if viewing on a phone).
Practice
Post-test 📝
See how well you learned what was taught.
If you don't see the quiz below, click this button to open in a new tab.
Open Quiz